Help & frequently asked questions
A little preparation.
A clearer record.
From your first recording to keeping a caregiver in the loop: learn how to make MedRecap part of your care routine.
No matching topics. Try a shorter search, such as “audio”, “reminder”, or “share”, or choose Clear.
Start here
MedRecap brings appointment preparation, visit audio, summaries, medications, symptoms, and trusted helpers together. Start by selecting the right patient profile: the profile shown in the app determines whose information you are viewing or adding.
Your first visit, from beginning to end
- Sign in and create or select a patient profile.
- Optionally create a Visit Prep appointment and finish its prep conversation.
- Record with permission, choose an existing audio file, or share a Voice Memo into MedRecap.
- Let transcription and analysis finish, then review the summary and check important details against the transcript.
- Review automatically identified medications and symptoms. Add missing information and set any reminders you want.
- Share selected visits or profile access with a trusted person; optionally enable automatic sharing of future visits.
1 · Record a live visit
Center microphone → Record a new visit → Recording consent
Choose this when you want MedRecap to capture the conversation as it happens. The recording screen shows a timer and sound waveform; transcription and AI analysis run after you finish recording.
- Select the patient profile. If you prepared this appointment, open its prep and tap Use this prepared visit for recording so the checklist is attached.
- Open the recording consent screen. Ask the people involved for permission and follow the clinic’s recording requirements. Continue with My Doctor Agrees — Start Recording only when you have permission. With linked prep, No Consent - Review Prepared Questions lets you use your questions without recording.
- Allow microphone access when prompted. Position the phone so voices are clear and the microphone is unobstructed.
- Check that the timer advances and the waveform responds. Tap the title to rename the visit if useful. Use Quick note, Bookmark, and your prep checklist during the conversation.
- When finished, press and hold the stop control until the recording ends. A brief tap is not the same as holding it. Follow the processing screen to the completed visit.
During recording
- Quick note: opens Visit Notes while recording continues. The panel shows the recording status and time. Type what you want to remember, then close the panel to return. These notes are included as context for the AI summary and saved with the visit.
- Bookmark: marks the current moment without typing. The count increases and a marker appears on the waveform. Later, use the bookmark filter in the transcript to find nearby lines.
- Prepared questions: tap the card near the top to tick off questions as you ask them. See the checklist walkthrough.
- Background recording: the app supports recording while you briefly leave the app or lock the screen. Return and check the status. Avoid force-closing the app during capture.
The current recording controls are Bookmark, hold-to-stop, and Quick note. Do not look for a required transcription-mode picker or assume a scrolling live transcript is available.
What if recording will not start or is interrupted?
Check the active profile and its recording permission, microphone access in device Settings, available storage, and any plan message. The recorder checks for more than 500 MB of free space and caps a recording at 120 minutes, with earlier duration warnings. If the app offers recovery of a saved recording, use that flow rather than recording the same visit again.
2 · Import from device or cloud storage
Center microphone → Upload a past recording
Use this for audio you already have in Files or another storage provider. The app’s file picker can show cloud locations that your phone’s file browser exposes; MedRecap does not ask for a separate cloud-storage connection here.
- First select the patient profile that should own the visit.
- Choose Upload a past recording, then tap the audio-file selection area.
- In the system file picker, browse local storage or an available cloud provider. On iPhone this can include On My iPhone and iCloud Drive; other providers appear when installed, signed in, and enabled in Files. On Android, use the locations offered by the document picker.
- Select one audio file. For cloud-only files, let the provider download it. Confirm the filename in MedRecap; use the X if you need to select a different file.
- Enter or check the doctor, original visit date, optional specialty, and optional facility. The date defaults to today, so change it for an older appointment.
- Tap Continue to transcription. Keep an internet connection while upload, transcription, and analysis finish. Review the resulting visit just as you would a live recording.
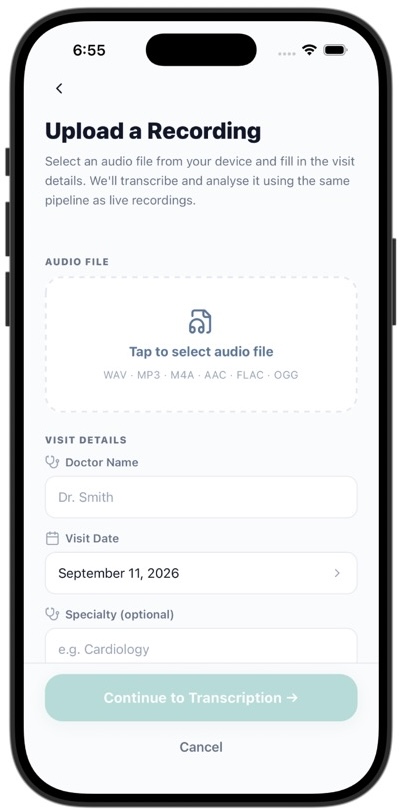
The picker lists WAV, MP3, M4A, AAC, FLAC, and OGG. Actual processing also depends on the audio being readable and containing usable speech. A file extension alone does not guarantee successful transcription.
My cloud folder or recording is missing. What should I do?
Open the provider’s app or the system file browser, sign in if needed, and make the file available locally. Then return to MedRecap and choose it again. If the provider cannot expose the file to the picker, save an audio copy into Files or device storage first. Select an audio file rather than a webpage link, folder, or transcript document.
3 · Import directly from Voice Memos
Voice Memos → Select recording → Share → MedRecap
The iPhone menu is called the share sheet. The app’s receiving feature is a share extension; “App Group” refers to the underlying file handoff, not a menu you need to find.
- Open MedRecap first, sign in, and select the correct patient profile. The current main version uses the active profile; it does not show a profile picker during this import.
- Open Voice Memos and select the recording. Open its More / three-dot menu if needed and choose Share.
- Choose MedRecap in the app row of the share sheet. If it is not visible, look under More. Share one recording at a time.
- MedRecap opens, receives the audio, and starts the visit processing flow when sign-in and profile loading are ready. Unlike the file-picker route, this path skips the upload metadata form.
- Review the visit after processing. The import initially uses today’s date; use the visit’s edit control to correct the date, title, clinician, or facility as necessary.
If MedRecap is already recording, the shared file waits rather than interrupting the live session. If sign-in or onboarding is unfinished, finish it before expecting processing to begin. Wait for one import to finish before sharing another file.
MedRecap does not appear in the share sheet.
Check More in the share sheet and confirm that you are sharing the audio recording itself. This requires the installed native app with its share extension; it is not a web-browser import. As a fallback, use Voice Memos’ share sheet to save the recording to Files, then use Upload a past recording in MedRecap.
I shared audio but nothing appeared.
Return to MedRecap, finish signing in, verify the active profile and upload permission, and check whether a recording or another processing job is still open. Follow any usage-limit or import error message. After resolving it, reopen the app and check Visits before sharing the same audio again.
Processing & your completed visit
All three audio paths converge on transcription and AI analysis. The processing screen reports progress and may let you add or refine visit details while you wait. Keep the original recording until you have checked the result.
| Visit section | How to use it |
|---|---|
| Summary | Read the plain-language recap. Use Copy where offered. Tap highlighted medical terms for explanations. |
| Assessment | Review key takeaways and expandable symptoms, conditions, medications, treatments, and tests. Open items for context. |
| Transcript | Search the conversation, inspect speaker labels and timestamps, and play available local audio. Use the bookmark filter to focus on marked moments. Timestamps are approximate. |
| Action Items | Review follow-up tasks, due dates, urgency, and details. Tick completed items; tap a bell to set a reminder. |
| My Notes | Read your recording notes, then edit and Save additional context when your access allows it. |
Find and maintain visits
Open Visits, choose past visits, and switch between All and Favorites. Open a visit to see its full record. On an owned visit, use the pencil to correct metadata and the star to mark a favorite. In the visit list, swipe a row to reveal Favorite and Delete where permitted. Deleting a visit removes it from history for everyone who has access, as the confirmation explains. Shared visits show only permitted sections and controls.
Action-item reminders
Tap the bell beside a task and allow notifications. The app uses the suggested due date; when there is no suggested date, it schedules roughly one hour ahead. If the suggested date has already passed, it schedules shortly ahead instead. Check the confirmation for the actual time. These are individual follow-up reminders, separate from the daily medication scheduler.
Recover a failed or incomplete result
If processing fails, read the error and use the retry option after resolving connectivity or access issues. The app retries some temporary failures automatically. If the original audio is missing, use Upload original recording where offered. A retry needs a saved transcript or audio; it cannot recreate a missing conversation from nothing.
Visit Prep: arrive with useful questions
Visit Prep helps you organize what has changed, explain symptoms clearly, and remember your priorities during a short appointment. It turns your descriptions into an overview, useful details, and questions you can discuss with your clinician.
- Select the profile and open Visit Prep from Home or Record, or create an upcoming appointment from Visits.
- Set the appointment date and time, doctor, and optional specialty and facility. Save the appointment and continue to the prep conversation.
- Explain the reason for your visit in your own words. Answer the AI’s follow-up questions about your experience, such as timing, severity, patterns, or what has changed.
- Finish the conversation so a prep summary is generated. Review the symptom overview, key details, and suggested doctor questions. Expand a question’s explanation of why it matters when available.
- Add your own questions under Questions you prepared using the text field and plus button. Hide suggestions that do not fit. You can reopen the conversation to refine your preparation.
- At the appointment, open this prep and tap Use this prepared visit for recording. Complete recording consent to carry the questions into the session.
Finish the prep conversation first. If the prepared-visit recording button takes you back to the conversation section, the prep summary is not ready yet. Open AI Visit Prep and finish it. You can use the ordinary live-recording route when you want to record without linked prep.
Appointment details can be edited with the pencil. Deleting an upcoming appointment also removes its prep notes, so use the delete control only when you no longer need that preparation.
Use prepared questions while recording
With a linked prep, a card near the top of the recording screen says, for example, 3 questions for your doctor, with an asked count. Tap it to open Your prep without stopping the recording.
- Check the Symptoms to mention chips to remember the topics you prepared.
- Under Questions for your doctor, tap a question’s circle after you have asked it. It gains a checkmark and the asked count updates.
- Tap again if you checked it by mistake. Close the sheet to return to the recording controls; completed states are saved to the appointment.
- Use the full-prep link if you need more context. Hidden questions do not appear in the recording checklist.
Interactive example · fictional questions, not a screenshot
Your prep
0 of 3 asked · tap to tick off
Symptoms to mention
FatigueQuestions for your doctor
This example demonstrates the checklist. It does not record audio or change your app.
Why are my prepared questions missing during recording?
Make sure you started through the correct prepared appointment, completed its prep conversation, and have visible questions or symptoms. Starting an unrelated new recording does not automatically attach a different appointment’s checklist.
Add & manage medications
Health → Medications → +
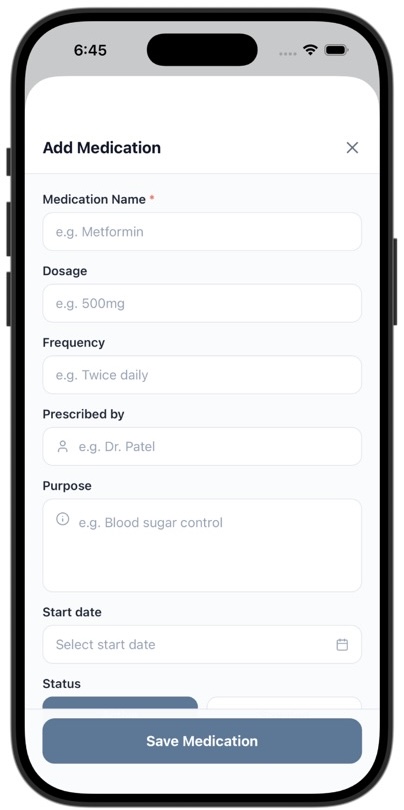
- Check the active profile, then tap the plus button / Add Medication.
- Enter the medication name. Use suggestions to help find the spelling, or enter the name you need.
- Add dosage, frequency, prescriber, purpose, and start date as appropriate. These fields describe the record; frequency text does not schedule notifications.
- Choose Active or Stopped. For a stopped medication, add an end date when appropriate.
- Tap Save Medication. Open the medication from the list to review and edit it later. Use Edit to change its Active / Stopped status, or Delete Medication to remove its saved entry.
Keep the list consistent with your clinician’s instructions. Updating a medication’s status in MedRecap is recordkeeping, not a recommendation to start or stop taking it.
Medications identified automatically
After processing a visit, MedRecap shows medication mentions extracted from the conversation in Health. AI entries are combined across visits by medication name; saved manual entries with the same name take precedence. Check whether a mention represents a current medicine, a stopped medicine, or something merely discussed.
Tap an AI medication to open Edit AI Medication, review and correct the details, then save it as a managed entry. Do this before expecting it in the reminder picker: the scheduler selects saved active medications, not just extracted mentions.
If a medication is missing, add it manually. If AI got the name or dose wrong, verify the original conversation and correct the saved record. Do not rely on automatic extraction as a complete medication reconciliation.
Set medication reminders
Health → Medications → Bell → Add medication reminder
- Save at least one active medication for the selected profile. If it is only an AI mention, open it and save a reviewed entry first.
- Tap the bell in Medications, then Add medication reminder. You can also enter the reminder flow from a medication’s detail screen.
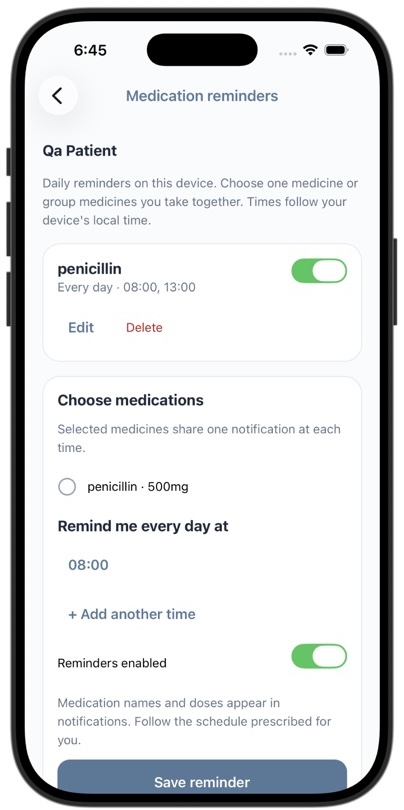
- Select one medicine, or group several medicines that you take at the same time. A group produces one notification at each selected time.
- Tap the displayed time to change it. Use + Add another time for additional daily times; remove times you no longer need. On iPhone, tap Done after adjusting the time picker.
- Leave Reminders enabled on and tap Save reminder. Allow notifications if prompted, then confirm the schedule appears in the list.
Edit, pause, or remove a schedule
Return to the bell screen. Use Edit to change medicines or times, the group switch to pause or resume it, and Delete to remove the schedule. Deleting a reminder does not delete the medications. When a saved medication is changed, stopped, or deleted, the app reconciles its reminders; review the schedule if it shows a reminder-needs-attention message.
- Daily only: these are daily schedules, not an every-other-day, weekly, or as-needed dosing engine.
- Device local time: times follow the device’s local time. Review schedules when traveling or changing time zones.
- Per device: sharing a medication or turning on Cloud Sync does not create the same schedule on someone else’s phone. Each person sets reminders on their own device.
- Notifications: enable Settings → Notifications and reminders in MedRecap and allow notifications in device Settings. Turning the app setting off pauses medication reminders.
- Lock-screen content: notifications include the profile name, medicine names, and doses. Adjust device notification previews if desired.
Why did no medication notification arrive?
Check the correct profile, active medication selection, saved times, group enabled switch, MedRecap’s notification setting, and device notification permission. Review device Focus / Do Not Disturb settings and local time. Signing out stops scheduling for that account. Reopen the app after changing permissions. If the app reports too many reminder times, remove unused times and save again.
Log & review symptoms
Health → Symptoms → +
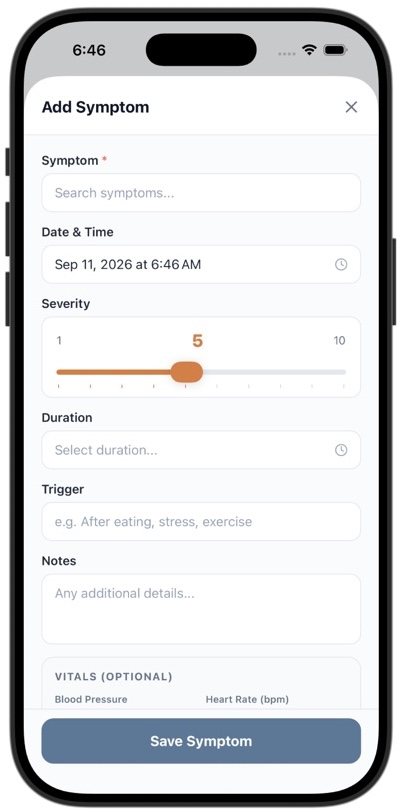
- Select the profile and open Symptoms. Tap Add Symptom.
- Search for or enter the symptom name. Set the date and time when it occurred.
- Choose a severity from 1 to 10, add duration, and describe a trigger or notes if useful.
- Optionally enter blood pressure, heart rate, temperature, or oxygen saturation. Use the displayed units; the profile’s temperature preference controls the temperature unit.
- Tap Save Symptom. Review the dated timeline, open an entry for detail, and use Edit to correct it. Add a new entry for a new occurrence rather than overwriting the previous episode.
Symptoms identified automatically
When a visit finishes analysis, named symptoms discussed in the transcript can be added to the timeline with a From visit source and a link to the visit. The app attempts to avoid adding the same named symptom twice for the same visit during retries and skips vague unnamed findings.
Review automatically added date, severity, duration, and context. The automatic entry’s date can reflect processing time rather than the symptom’s true onset; edit it when necessary. The symptom may have been mentioned historically, so verify what was actually said. Add missing episodes manually, and delete incorrect entries only after checking their source.
My Facts, alongside Medications and Symptoms, shows profile health facts such as allergies, chronic conditions, blood type, doctor, and emergency contact. Use Edit Profile to maintain these separately from the symptom timeline.
Ask AI about a completed visit
Open visit → Ask AI
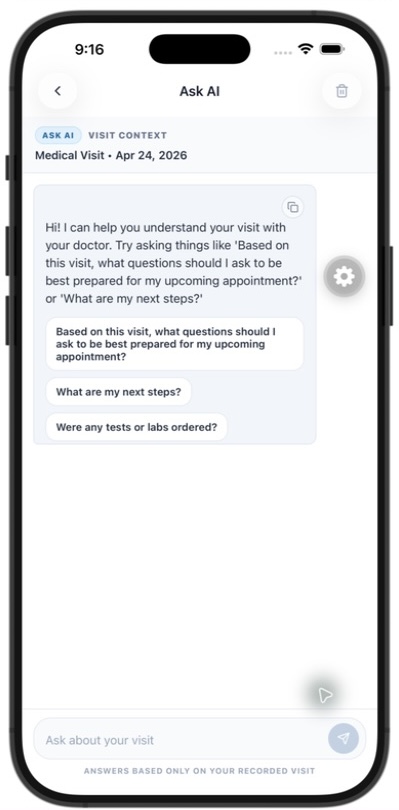
Use Ask AI to find or explain information in that visit: “What were my next steps?”, “Were tests or labs ordered?”, or “What should I ask at my follow-up?” It uses the visit transcript and related information as context.
- Open a processed visit with a transcript, then tap Ask AI.
- Choose a suggested prompt or type a specific question. Ask a follow-up if you need clarification.
- Where an answer provides a timestamp reference, use it to return to the related transcript passage. Check the original wording for important decisions.
- Use Copy to keep an answer where offered. The clear-chat / trash control removes the saved conversation when confirmed; it is separate from deleting the visit.
Ask AI depends on transcript access and your plan or usage allowance. If it is unavailable on a shared visit, ask the owner to check the Transcript permission. Answers are a memory aid for that visit and may be incomplete or mistaken.
Share with family, caregivers & collaborators
Settings → Manage Shared Access
Enable Cloud Sync to use family sharing. Choose the profile you intend to share before starting. Sharing uses the recipient’s MedRecap account email; check it carefully, especially when a person uses Apple sign-in with a private relay address.
Choose the scope first
| Share type | Use it for | What to check |
|---|---|---|
| Selected visit(s) | A particular appointment or a few records. | Choose the visits and permitted visit sections. This alone does not grant medications, symptoms, or recording rights for the entire profile. |
| Profile access | An ongoing care relationship. | Review profile health data, capabilities, included visits, and automatic future sharing. |
| Exported copy | Sending a file or text through another app. | A copy does not stay in sync and cannot be withdrawn by revoking MedRecap access. |
Share one or several visits
- For one visit, open it and tap Share visit. For multiple visits, use the share-selection control in Visits, then select the records you want to include.
- Choose a previous recipient or enter the recipient’s account email. Add an optional private relationship label to help you recognize the person.
- Choose an access level, then open Advanced Controls to review exactly which sections are included. Keep at least one visit section enabled.
- Review any Auto-share future visits option. Leave it off for a one-time selection, or read the ongoing sharing instructions before enabling it.
- Review the recipient and selections, then send the visit invitation. Check the sharing screen afterward for the resulting access or pending invitation.
Share a profile
- Open Settings → Manage Shared Access → Invite Someone (or Invite Caregiver in Settings).
- Choose the recipient by email, a previous recipient, or scanning their QR code.
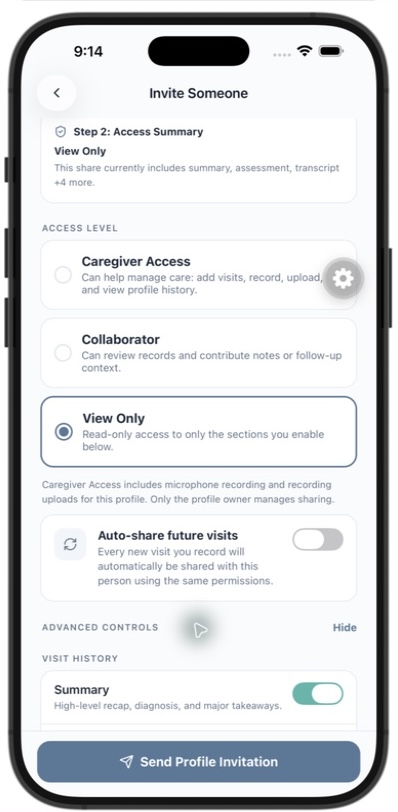
- Select Caregiver Access, Collaborator, or View Only. Inspect Advanced Controls and the access summary rather than relying on the role name alone.
- Choose whether future visits should automatically be shared. Review profile health sections and included visits.
- Tap Send Profile Invitation. Access for an existing account may be granted immediately; a new account invitation remains pending until the recipient signs up with the matching email.
The optional relationship label is for your organization, such as “Daughter” or “Care coordinator”; it does not grant permissions. A queued invitation email does not guarantee that the recipient has read it.
Customize access & manage recipients
Start with an access level
- Caregiver Access: broad assistance with a profile, including adding visits, microphone recording, uploading recordings, and reviewing history. It is the role for someone helping manage care.
- Collaborator: intended for reviewing records and contributing notes or follow-up context. It does not grant general caregiver editing or recording by default.
- View Only: read-only access to enabled sections.
Roles provide presets, and capabilities also depend on whether the share covers a profile or only a visit. Caregiver-level profile access inherently includes creation, recording, and upload in the current app; choose a narrower role if those actions should not be available.
Review Advanced Controls
- Visit History: Summary, Assessment, Transcript, Action Items, and My Notes.
- Health Data, for profile shares: Medications, Symptoms, Health Facts, and Appointments.
- Capabilities, for profile shares: Create Visits, Record Audio, and Upload Recordings. The screen also contains a Manage Sharing control, but the current workflow describes sharing management as owner-controlled; do not rely on that toggle to delegate ownership or all invitation management.
For example, a relative can receive the summary and actions without the full transcript or your personal notes. A visit-only invitation shows only visit-section controls. Review the access summary after changing presets, since changing the level resets its default selections.
Change existing access
- Open Manage Shared Access and select the person’s access for the relevant profile.
- Review the access level, permissions, included visits, and Auto-share future visits. Update the private label if needed.
- Tap Save Changes. Turning on profile-level permissions or auto-share from a visit-only relationship can expand it into profile access; review that scope change before saving.
- To end sharing, choose Revoke All Access and confirm. Cancel a pending invitation if it has not become active.
A specific visit’s permissions can differ from the profile’s permissions. If one visit looks different, inspect that visit’s share as well. Revocation stops future in-app access; it cannot retract exported files, screenshots, or text someone already copied.
Automatic updates & future visits
There are two related controls: Cloud Sync makes cloud-backed sharing possible; Auto-share future visits chooses whether new visits for a particular profile are automatically shared with a particular person.
- Enable Cloud Sync in Settings and open Manage Shared Access for the correct profile.
- Create the recipient’s share or open their existing access.
- Turn on Auto-share future visits. Check the permission set it will use and the visits already included.
- Send the invitation or tap Save Changes. After a new visit for that profile is processed and synchronized, the app can share it with that recipient using the configured permissions.
- The recipient opens the shared profile in MedRecap to see permitted updates. They can check the inbox and refresh or reopen the profile if an update has not appeared yet.
You do not need to manually send each new visit once this is enabled. New visits imported from audio also go through the shared processing workflow. Updates require successful processing, internet connectivity, and active access; do not expect a live audio feed or a notification for every edit.
Sharing one visit does not automatically enable future sharing. A profile share is broader than a static exported copy, and its permissions determine which profile information is available. Medication reminder schedules remain local to each person’s device even when medication records are shared.
Share using a QR code: both sides
The “barcode” feature uses a QR code. The code belongs to the recipient and contains their account contact identity. The person sending access scans the recipient’s code. Scanning fills in the invitation; it does not send medical records or grant access by itself.
If you are receiving someone else’s records
- Sign in to your own MedRecap account.
- Open Settings → Manage Shared Access → My QR code.
- Show the code to the person who owns the records. Confirm that the displayed identity is the account where you want access. If you are apart, tell the sender the account email shown on the QR page so they can enter it in their invitation.
- After the owner sends the invitation, look for the shared profile or incoming invitation in MedRecap. Follow the receiving instructions.
If you are sending your records
- Choose the patient profile whose records you want to share.
- Open Manage Shared Access → Scan QR code, or choose Scan QR from the invitation flow.
- Allow camera access and point the scanner at the recipient’s MedRecap code.
- Review the prefilled recipient identity. Choose the sharing scope, access level, section controls, and auto-share setting.
- Send the invitation only after those choices are correct. To share just a visit, use the visit-sharing flow and the recipient’s confirmed email if your scan opened a profile invitation.
To share in both directions, repeat with the roles reversed; one invitation does not grant mutual access. If scanning is unavailable, use Enter email instead. For camera permission that has been denied, use the offered device Settings link. An invalid-code message means the scanner did not find a supported MedRecap contact link—try again with the right code.
Receive shared records & use the inbox
Sign in with the exact account email the sender used. Check Manage Shared Access for records shared with you and pending invitations. Depending on the invitation route, existing-account access may appear immediately, while an incoming invitation offers Accept and Decline.
- Review the sender, patient profile, and scope. Accept an incoming invitation if you want that access, or Decline it.
- Open the profile switcher and select the profile marked Shared.
- Open Visits, Health, or appointment information as permitted. A one-visit share does not promise the entire history.
- If you have caregiver capabilities, keep that shared profile selected when recording or uploading for the person.
- Use the Home inbox bell to review sharing invitations, visit-ready messages, and other app events. Tap an item to open its related content where available.
I was invited but cannot find the shared profile.
Check which email your MedRecap account uses, including a private relay address if applicable. Ask the sender to verify that exact address and that access is still active. Check pending invitations and your inbox, return to the sharing screen, and refresh with an internet connection. Ask the sender to review the included visits and permissions if the profile appears but expected content does not.
Why are editing or recording buttons missing?
The owner controls your role and capabilities. View Only and a visit-only share do not provide general profile editing or recording rights. Ask the owner to review your access for the exact profile and visit; switching to a shared profile alone does not make you its owner.
Export audio, copy text & share outside the app
- Copy summary or transcript: use the copy control where offered, then paste into the destination you choose. Check what you copied before sending it.
- Export original audio: open an owned visit with audio still available on this device and tap the download / Export audio control. Choose the destination in the system share sheet. This exports audio, not a permission-controlled shared profile.
- Export several recordings: enter selection mode in Visits using its selection / share control (or long-press an eligible visit), select visits with available audio, then use the export / download control. The current selection flow depends on your access and Cloud Sync. Only available recordings can be exported.
- Export All Data: open Settings and choose this option to send a JSON representation of the visit records currently loaded in the app through the system share sheet. Despite the label, the current implementation is not a complete account backup of all profiles, medications, reminders, and audio.
- In-app sharing: use Share visit or Manage Shared Access when the recipient should have controlled access and updates inside MedRecap.
A text or audio copy stays as it was when exported. It does not receive future updates, and revoking in-app access cannot delete it from another person’s storage. Shared structured records do not guarantee that the original recording is available on every device.
Settings, plans & data controls
Preferences and account
Account Identity manages your account details; Patient Profiles manages the people you care for. Language lets you choose an app language or the system default. A profile’s preferred language and temperature unit are separate profile preferences. English labels are used throughout this guide.
Notifications and reminders controls app notifications and medication reminder scheduling. Device permissions also apply. Biometric Lock uses supported device authentication to protect access to the app. Cloud Sync supports cloud-backed records and sharing; it is not the switch for offline AI.
Plans, credits, and restoring purchases
Use Settings to check Current Plan, available credits, and any renewal or expiry information. Buy 1 upload and Upgrade open the current purchase options. Availability of audio processing, Visit Prep, and Ask AI depends on your plan and usage allowance. Read the in-app limit message and plan screen for the offer that applies to your account; an audio credit does not necessarily unlock every AI feature.
If a purchase is not recognized, use Restore Purchases where available with the same store account. Use Manage Subscription to open the store’s subscription controls. Signing out or deleting app data is not a subscription cancellation.
Deletion: check the scope
Visit, symptom, medication, and appointment delete controls affect the selected item. Appointment deletion also removes its prep. Review each confirmation before proceeding.
Settings → Delete All Data currently clears local visit records and this account’s local medication reminder schedules. Do not treat it as deletion of the cloud account, all cloud records, or every shared copy. Cloud data can remain available. For questions about account or cloud-data deletion, use the app’s support/feedback route and privacy policy.
Get help or report a problem
Use Send Feedback from Profiles to rate the app or report an issue. Include the app version, device, workflow, and the exact error text. Avoid including more personal health information than needed. Settings also links the privacy policy, terms, and fair-use policy.
Frequently asked questions
Which of the three audio methods should I use?
Use live recording for a conversation happening now, Upload a past recording for a file in local or cloud storage, and Voice Memos → Share → MedRecap to send audio directly from that app. All produce a visit record after processing.
Is there a live transcription mode or offline AI?
The current recording session shows recording status, notes, bookmarks, and linked prep. Transcription follows capture. On-Device Processing is marked Coming Soon in Settings; cloud transcription and analysis need internet access.
Will adding “twice daily” to a medicine schedule reminders?
No. Frequency is descriptive text. Save the active medication, open the bell in Health → Medications, select it, choose daily times, and save the reminder.
Why is an AI medication missing from reminder choices?
The reminder picker uses saved active medications. Open the AI medication, verify its details, and save it as a managed entry before creating the schedule.
Can I group medicines into one notification?
Yes. Select multiple active medications in one reminder group, then choose the daily times. Check that the grouping matches the instructions you were given.
Will my caregiver get my reminder alarms?
Sharing medication records does not share the device-local alarm schedule. The caregiver can create their own reminders on their device for the shared profile when its medications are accessible.
Do notes interrupt the recording?
No. Quick note opens Visit Notes with the ongoing recording status. Close the panel to return. Notes provide additional summary context; a bookmark marks a moment without requiring text.
How do I bring Visit Prep questions into a recording?
Finish the appointment’s prep conversation and choose Use this prepared visit for recording. During capture, tap the questions card to open Your prep and tick off questions.
Does a QR scan immediately share my records?
No. The sender scans the receiver’s code to fill in that receiver’s identity, then reviews the scope and permissions and sends an invitation.
Does sending one visit automatically send the next one?
Only if you enable Auto-share future visits for that profile and recipient. Check the recipient’s access screen; one-time visit sharing is not automatic future sharing.
Does turning auto-share off remove old access?
No. Review included visits and profile permissions separately. Use Revoke All Access if you want to end that sharing relationship.
Can I share a summary without the transcript or personal notes?
Yes. Customize the visit-section toggles. Keep Summary enabled and disable Transcript and My Notes if those should not be shared.
Why does a shared visit look incomplete?
Its permissions may exclude sections. A visit-specific share can differ from profile permissions. Ask the owner to inspect the exact visit’s access and confirm processing has finished.
Why did the imported visit use today’s date?
Voice Memos import initially dates the visit today and skips the metadata form. Correct the visit date using Edit after import. The file-picker route lets you set the original date before processing.
Can I use the app to decide treatment or an urgent health concern?
The app organizes recorded information and can make mistakes. Use your clinician’s instructions for care decisions and the appropriate local urgent-care or emergency service when needed.
Can I open or print this guide offline?
Yes. Use Print / Save PDF at the top of this page; every FAQ answer is expanded automatically for printing, and your browser can save the result as a PDF.